Flat roofs might seem simple, but even a tiny puncture can turn into a nightmare if left unchecked. Water damage from flat roof leaks accounts for nearly 40 percent of costly structural repairs in commercial buildings each year. Most people assume patching a flat roof is a complicated job best left to professionals, but the real surprise is that with the right steps and attention to detail, almost anyone can get a durable, lasting fix without breaking the bank.
Table of Contents
- Step 1: Assess Your Current Roof Condition
- Step 2: Gather Necessary Tools and Materials
- Step 3: Prepare The Roof Surface For Repair
- Step 4: Execute The Repair Process
- Step 5: Inspect The Repairs For Quality And Integrity
- Step 6: Maintain Your Roof To Prevent Future Issues
Quick Summary
| Key Point | Explanation |
|---|---|
| 1. Thoroughly assess roof condition | Conduct detailed visual and interior inspections to identify existing damage before repairing your flat roof. |
| 2. Gather appropriate tools and materials | Use safety equipment and roofing materials compatible with your specific roof type for successful repairs. |
| 3. Properly prepare roof surface | Clean and inspect areas around damage to ensure repair materials adhere effectively and create a lasting seal. |
| 4. Execute repair with precision | Follow specific techniques for your roof type, applying patches strategically to ensure waterproofing and durability. |
| 5. Regularly maintain your roof | Schedule quarterly inspections to identify wear, clear drains, and apply protective coatings to extend your roof’s lifespan. |
Step 1: Assess Your Current Roof Condition
Before diving into flat roof repairs, a thorough assessment is critical to understanding the extent of damage and determining the most effective repair strategy. Your flat roof assessment will serve as the foundation for all subsequent repair work, helping you avoid unnecessary expenses and potential long-term structural issues.
Begin by conducting a comprehensive visual inspection from both the exterior and interior of your building. Exterior inspection requires careful observation of the entire roof surface, looking for telltale signs of wear and damage. Walk carefully across the roof, checking for areas of standing water, known as ponding, which can indicate improper drainage or structural sagging. Examine the roofing membrane for cracks, blisters, punctures, or areas where the material appears worn or separated. Pay special attention to seams and edges, as these are common points of potential failure.
The interior inspection is equally important. Check the ceiling and walls underneath the roof for water stains, discoloration, or signs of moisture intrusion. Dark spots, peeling paint, or soft areas in the ceiling can indicate active leaks or water damage that might not be immediately visible from the roof’s surface. Use a flashlight to inspect the underside of the roof deck for any signs of rot, mold, or structural compromise. Learn more about professional roof damage detection to understand the nuanced indicators professionals look for during a comprehensive assessment.
If you are uncomfortable performing this inspection or notice significant damage, it is recommended to contact a professional roofing contractor. They can provide a detailed evaluation and help you understand the precise condition of your flat roof. A professional assessment can reveal hidden issues that might not be apparent to an untrained eye and can save you significant money and potential structural damage in the long run.
Step 2: Gather Necessary Tools and Materials
Preparing for a flat roof repair requires careful selection of tools and materials that match your specific roof type and damage characteristics. Proper preparation can make the difference between a successful repair and a potential costly mistake. Before starting, understand that different roofing materials like EPDM, TPO, or modified bitumen will require slightly different repair approaches and specialized materials.
Your basic toolkit should include safety equipment as the top priority. Protective gear is non-negotiable when working on roof repairs. This means sturdy work boots with good traction, safety glasses, work gloves, and a hard hat. For ladder safety, invest in a sturdy extension ladder with rubber feet and ensure it extends at least three feet above the roof edge. Professional-grade tools will make your repair process smoother and more efficient.
Materials will vary based on your specific roof type, but some universal items are essential. You will need roofing sealant compatible with your membrane, reinforcing fabric, utility knife, measuring tape, clean rags, rubbing alcohol for surface preparation, and a roller for applying patches. Check out our guide on specialized roofing materials to ensure you select the right products for your specific roof type. Moisture meters can help identify hidden damage, while a quality caulking gun will assist in precise sealant application.
Here is a table that organizes the essential tools and materials commonly needed for flat roof repair, along with their purposes and notes to help ensure a successful job.
| Tool/Material | Purpose | Notes |
|---|---|---|
| Safety gear (boots, gloves, glasses, hard hat) | Personal protection during repair | Mandatory for safety |
| Extension ladder | Safe access to roof | Ensure rubber feet and proper extension |
| Roofing cement or sealant | Adheres patches, seals damage | Must be compatible with roof material |
| Reinforcing fabric/patch material | Adds strength to repair area | Cut to overlap damage by 2 inches |
| Clean rags | Cleaning/preparing roof surface | Use with rubbing alcohol |
| Rubbing alcohol | Removes contaminants for better adhesion | Area must dry fully before patching |
| Utility knife | Cuts away damaged membrane and shapes patches | Use fresh blades for clean cuts |
| Measuring tape | Ensures correct patch size and overlap | Measure 2 inches beyond damaged area |
| Hand roller | Secures patch and eliminates air bubbles | Work from center outward |
For most DIY flat roof repairs, you will want to have the following materials on hand:
- Roofing cement or specialized sealant
- Reinforcing fabric or patch material
- Clean cloth rags
- Rubbing alcohol
- Utility knife with spare blades
- Measuring tape
- Hand roller
Remember that while having the right tools is important, knowing how to use them correctly is equally crucial. If you feel uncertain about any part of the repair process, consulting a professional roofing contractor can save you time and prevent potential further damage to your roof.
Step 3: Prepare the Roof Surface for Repair
Preparing your flat roof surface is a critical step that can make or break the success of your repair work. Proper surface preparation ensures that repair materials adhere correctly and create a long-lasting solution. This stage requires meticulous attention to detail and a systematic approach to cleaning and treating the damaged area.
Begin by thoroughly cleaning the repair area using a stiff brush or broom to remove loose debris, gravel, and any dirt that could interfere with the repair process. Dirt and loose materials can prevent proper adhesion of repair materials, so take your time with this initial cleaning. Use rubbing alcohol or a specialized roofing cleaner to remove any remaining oils, dirt, or contaminants from the surface. Wipe the area with clean rags, ensuring the surface is completely dry and free from any moisture or residue that could compromise the repair.
Carefully inspect the area around the damage, looking for signs of additional wear or potential problem spots.
Cut away any loose or damaged roofing material using a sharp utility knife, creating clean edges that will provide a solid foundation for your patch. If you encounter areas with bubbling or lifting membrane, you’ll need to carefully cut and flatten these sections. Explore our detailed guide on surface preparation techniques to ensure you’re using the most effective methods for your specific roof type.
Before applying any repair materials, perform a final check to ensure the surface is properly prepared:
- Surface is completely clean and dry
- Damaged areas have been trimmed with clean, straight edges
- No loose debris remains
- Surrounding area is stable and intact
Take your time during this preparation stage. Rushing through surface preparation can lead to repair failures that become costly and time-consuming problems down the road.
 If you encounter any areas of significant damage or feel uncertain about the repair process, it’s always best to consult with a professional roofing contractor who can provide expert guidance and ensure your roof receives the care it needs.
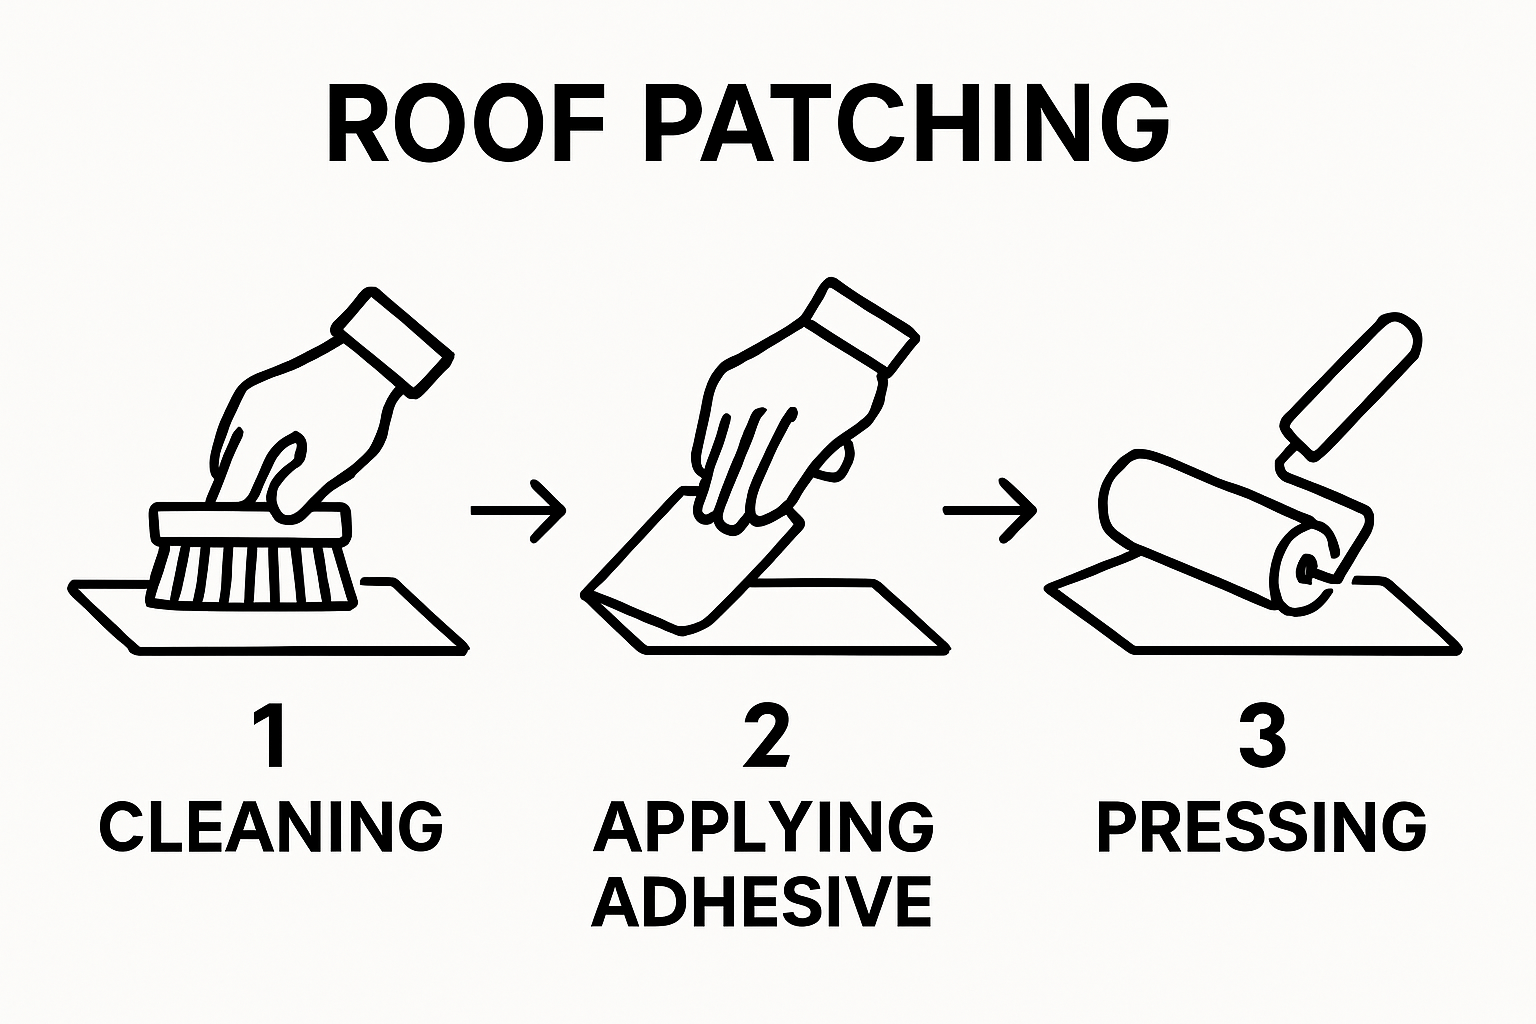
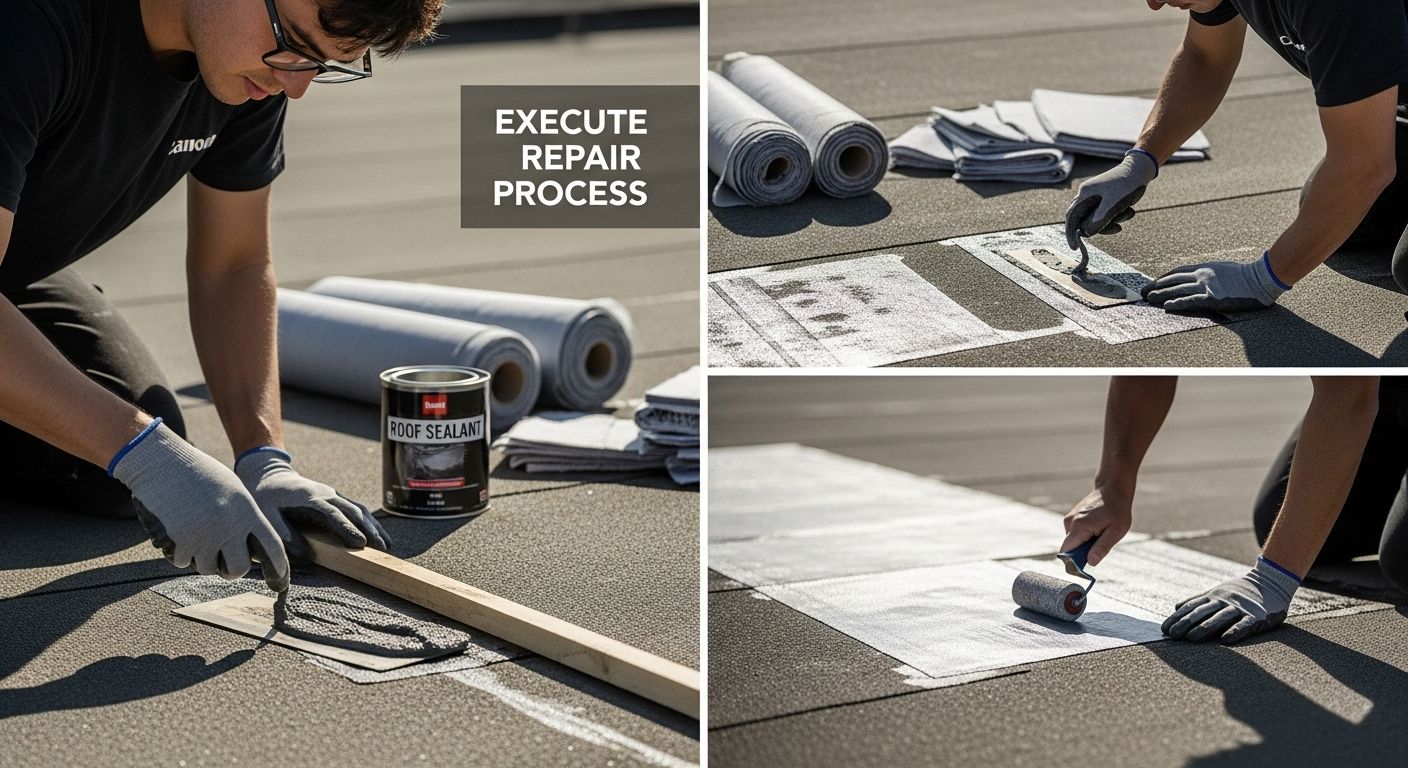
Step 4: Execute the Repair Process
The execution of your flat roof repair requires precision, patience, and a methodical approach. Different roof types demand specific repair techniques, so the process will vary slightly depending on whether you’re working with EPDM, TPO, or modified bitumen roofing materials. Your previous preparation work sets the stage for a successful repair, and now it’s time to apply your carefully selected materials.
Begin by cutting your repair patch to size, ensuring it extends at least 2 inches beyond the damaged area on all sides. This overlap is crucial for creating a watertight seal. If using reinforcing fabric, cut it slightly smaller than your primary patch to prevent bulky edges. Apply a thin, even layer of roofing cement or specialized adhesive to the prepared surface using a trowel or roller, working carefully to eliminate any air bubbles or uneven spots. Press the reinforcing fabric into the adhesive first, smoothing it with firm, consistent pressure to remove any potential air pockets. Learn more about advanced patching techniques to ensure a professional-quality repair.
After applying the reinforcing fabric, apply your primary patch material, again using firm, smooth strokes to eliminate air bubbles and ensure complete adhesion. Use a hand roller to press the patch firmly, working from the center outward to push out any trapped air or excess adhesive. Pay special attention to the edges, ensuring they are completely sealed and smooth. For some roofing materials, you might need to apply a secondary coat of sealant around the patch edges to create an additional water-resistant barrier.
Verify your repair by checking for these key indicators:
- No visible air bubbles or wrinkles in the patch
- Edges are completely sealed and smooth
- Patch extends at least 2 inches beyond the original damage
- Surface feels uniformly flat and consistent
Remember that while DIY repairs can be effective for small areas, extensive damage or recurring issues might indicate a need for professional intervention. Take your time, work carefully, and don’t hesitate to seek expert advice if you feel uncertain about any part of the repair process.
Step 5: Inspect the Repairs for Quality and Integrity
After completing your flat roof repair, a thorough inspection is crucial to ensure the longevity and effectiveness of your work. This final step is your quality control checkpoint, designed to catch any potential issues before they become costly problems. Take your time and approach the inspection with a critical eye, understanding that even small overlooked details can compromise your entire repair.
Begin by examining the repaired area from multiple angles and lighting conditions. Sunlight can reveal imperfections that might be invisible under normal circumstances. Look closely for any signs of bubbling, wrinkling, or uneven surfaces that could indicate improper adhesion. Run your hand gently over the patch, feeling for any inconsistencies or areas that seem less secure. Pay special attention to the edges of your repair, ensuring they are completely sealed and smooth, with no gaps or lifting that could allow water penetration. Discover professional techniques for thorough roof inspection to enhance your assessment skills.
To validate the repair’s integrity, conduct a water test by carefully spraying the repaired area with a garden hose. Observe how water flows across the surface and check the interior ceiling directly beneath the repair for any signs of moisture intrusion. Watch for water beading properly on the surface or flowing smoothly to drainage points. A successful repair will show no signs of leaking or water pooling.
Below is a checklist summarizing the key criteria for verifying the quality and integrity of your flat roof repair after completion.
| Inspection Criteria | What to Look For |
|---|---|
| Patch Condition | No visible bubbles, wrinkles, or uneven surfaces |
| Edge Sealing | Edges are completely sealed and smooth |
| Water Penetration Test | No water penetration during hose test |
| Surface Uniformity | Patch feels uniformly flat and consistent |
| Surrounding Roof Material | No signs of additional stress or new issues nearby |
| Interior Ceiling Check | No moisture, leaks, or stains under the repaired area |
| During this test, look for how the patch responds to water pressure and ensure it remains firmly adhered to the surrounding roofing material. |
Verify your repair’s quality by checking these critical indicators:
- No visible bubbles or wrinkles in the patch
- Edges are completely sealed and smooth
- No water penetration during hose test
- Patch feels uniformly flat and consistent
- Surrounding roof material shows no signs of additional stress
Remember that while a careful DIY repair can be effective, some damages require professional assessment. If you have any doubts about the repair’s quality or notice any concerning signs during your inspection, it’s always wise to consult a professional roofing contractor who can provide expert evaluation and additional guidance.
Step 6: Maintain Your Roof to Prevent Future Issues
Maintaining your flat roof is not just about fixing problems as they arise, but proactively preventing future damage. Consistent maintenance is your first line of defense against costly repairs and premature roof replacement. Think of your roof like a car that needs regular oil changes and tune-ups to keep running smoothly and efficiently.
Schedule quarterly inspections, paying special attention to areas prone to wear and potential water accumulation. Drainage is critical for flat roofs, so keep all gutters, downspouts, and roof drains clear of debris that could cause water to pool. Leaves, branches, and other organic materials can quickly create blockages that lead to water damage. Learn more about effective roof drainage strategies to protect your investment. During these inspections, look for early signs of potential issues such as small cracks, loose seams, or areas where the roofing material appears worn or is starting to lift.
Develop a seasonal maintenance routine that accounts for different weather challenges. In autumn, remove fallen leaves and check for any damage from summer storms. Winter requires monitoring for ice dam formation and potential snow load, while spring is an ideal time to conduct a comprehensive inspection after harsh weather conditions. Clean the roof surface regularly using soft-bristled brushes or leaf blowers, avoiding pressure washers that could damage the roofing membrane. Apply a UV-protective coating annually to help extend the life of your roof, especially in areas with intense sunlight exposure.
Ensure your maintenance routine covers these critical areas:
- Clear drainage systems every three months
- Remove debris from roof surface
- Check for signs of wear or damage
- Inspect roof edges and seams
- Apply protective coatings annually
Remember that while DIY maintenance is valuable, professional inspections every 1-2 years can catch potential issues that might escape an untrained eye. Your proactive approach can significantly extend your roof’s lifespan, saving you thousands in potential repair or replacement costs.
Ready to Fix Your Flat Roof the Right Way?
After reading the “Flat Roof Repair Guide: Fix Your Roof Easily,” you know how crucial it is to spot water stains, prepare your surface, and execute repairs without hidden mistakes. Many homeowners discover the process can quickly get overwhelming with ponding water, tricky patchwork, and the uncertainty of whether the repair will really hold. If you are worried about finding interior leaks or keeping up with drainage maintenance, you are not alone. Roofing repairs demand not only the right tools but also the expertise to handle every detail with care and precision.
That is where Liberty Roofworks steps in. Our team specializes in both residential roof repair and complex commercial roof services, offering proven solutions whether you need a simple fix or a long-lasting flat roof installation. Do not risk making costly DIY mistakes or letting small problems become big headaches. Visit Liberty Roofworks now to request a free, expert roof inspection and see why Charlotte, NC trusts us for reliable flat roof repairs. Take action today to protect your home or business before the next storm hits.
Frequently Asked Questions
What are the first steps in assessing my flat roof’s condition?
Begin by conducting a thorough visual inspection from both the exterior and interior of your building. Look for signs of wear, such as cracking, blistering, or areas of standing water, and check the ceiling for water stains or signs of moisture intrusion.
What tools and materials do I need for flat roof repairs?
Basic tools include safety gear, a utility knife, measuring tape, and a hand roller. Essential materials are roofing cement or sealant, reinforcing fabric, clean rags, and rubbing alcohol for surface preparation.
How should I prepare the roof surface before making repairs?
Thoroughly clean the repair area to remove debris and contaminants. Use rubbing alcohol or a specialized cleaner, and ensure the surface is completely dry. Trim any loose or damaged roofing material to create clean edges.
How do I confirm the quality of my flat roof repair after completion?
Inspect the repaired area for any visible bubbles, wrinkles, or uneven surfaces. Conduct a water test by spraying the area with a hose to check for leaks or water penetration. Ensure all edges are sealed and smooth.
