Roof problems can silently drain your budget and put your home at risk. Studies show that over 90 percent of homeowners miss early warning signs of roof damage until repairs become urgent and expensive. Knowing how to inspect your roof safely and thoroughly can help you catch trouble early, protect your investment, and avoid preventable headaches. This guide will help you approach every step of roof inspection with confidence and practical know-how.
Table of Contents
- Step 1: Prepare for a Safe Roof Inspection
- Step 2: Assess Roof Surface for Damage
- Step 3: Evaluate Flashings, Gutters, and Edges
- Step 4: Document and Photograph Roof Findings
- Step 5: Verify Inspection Results and Plan Next Steps
Quick Summary
| Key Point | Explanation |
|---|---|
| 1. Use Essential Safety Gear | Always wear slip-resistant shoes, a helmet, safety glasses, and gloves for roof inspections. These items are crucial for your safety. |
| 2. Assess Damage from Inside First | Check for water stains, discoloration, and mold inside your home to identify roof issues not visible from outside. |
| 3. Carefully Inspect Roof Components | Focus on flashings, gutters, and edges for signs of damage. Proper drainage and sealing are vital for roof integrity. |
| 4. Document Findings with Photos | Take clear, labeled photographs of any damage from multiple angles to support future repairs and assessments. |
| 5. Prioritize Repair Needs | Categorize your findings into immediate repairs and long-term maintenance. Address urgent issues first to prevent further damage. |
![]() |
|
Step 1: Prepare for a Safe Roof Inspection
Preparing for a safe roof inspection begins with understanding the critical safety protocols that protect you from potential hazards. According to NRCIA, proper preparation is essential before stepping onto any roof surface.
Your safety gear is your first line of defense. You will need specific equipment to conduct a secure inspection: slip-resistant shoes, a sturdy helmet, safety glasses, and protective gloves. These items are not optional accessories but mandatory safety requirements. Before climbing onto the roof, perform a ground level assessment using binoculars to identify potential problem areas and structural risks. OSHA recommends establishing controlled access zones and ensuring you have proper fall protection systems in place.
Weather conditions play a significant role in roof inspection safety. Avoid inspecting roofs during wet, icy, or extremely windy conditions. Check the forecast and plan your inspection during clear, dry weather with moderate temperatures. Always have a spotter or partner who can assist you and call for help if an emergency occurs. Remember that no repair or inspection is worth risking your personal safety.
For a comprehensive overview of roof inspection safety, check out our guide on essential roof inspection tips.
Step 2: Assess Roof Surface for Damage
Assessing your roof surface requires a systematic and thorough approach to identify potential issues before they become costly repairs. According to TASBRMF, an effective roof inspection starts by understanding key indicators of damage both inside and outside your home.
Begin your assessment from inside the house. Look for telltale signs of roof damage such as water stains on ceilings, sheetrock discoloration, and any evidence of mold growth near walls or ceiling corners. These interior signs can reveal significant roof problems that might not be immediately visible from the outside. Next, walk the perimeter of your home and examine exterior walls for signs of water damage like mildew stains, foundation cracks, or unusual moisture patterns. When you move to the roof surface, NACHI recommends checking multiple critical components including roof coverings, flashing, and overall structural integrity.
While on the roof, pay close attention to specific damage indicators such as missing or cracked shingles, areas of pooling water, visible dents or chips, and compromised roof seals. Soft or spongy areas could indicate underlying wood rot or water damage. Take detailed notes and photographs of any suspicious areas for further investigation or professional assessment. For a comprehensive understanding of potential roof damage, check out our guide on identifying home roof damage.
Step 3: Evaluate Flashings, Gutters, and Edges
Evaluating the critical components of your roof’s drainage and protective systems requires a meticulous and systematic approach. According to NACHI, understanding how flashings, gutters, and edges work together is essential for preventing potential water damage and maintaining your roof’s structural integrity.
Start by closely examining the roof’s flashings around chimneys, vents, and skylights. Look for signs of cracking, separation, or rust that could compromise their water-sealing capabilities. TASBRMF recommends walking the perimeter of your home to identify external indicators of potential gutter and edge problems. Check your gutters for debris buildup, sagging sections, or signs of separation from the roofline. Pay special attention to downspouts and ensure they direct water at least three feet away from your home’s foundation to prevent potential water damage.
Carefully inspect roof edges and drip edges for signs of warping, cracking, or missing sections. These areas are critical in preventing water from seeping under your roof’s protective layers. Look for mildew stains on exterior walls or foundation cracks that might indicate improper water drainage. If you notice any significant issues, it might be time to consult a professional.
 For more detailed insights into protecting your roof’s critical components, check out our guide on drip edges and their importance.
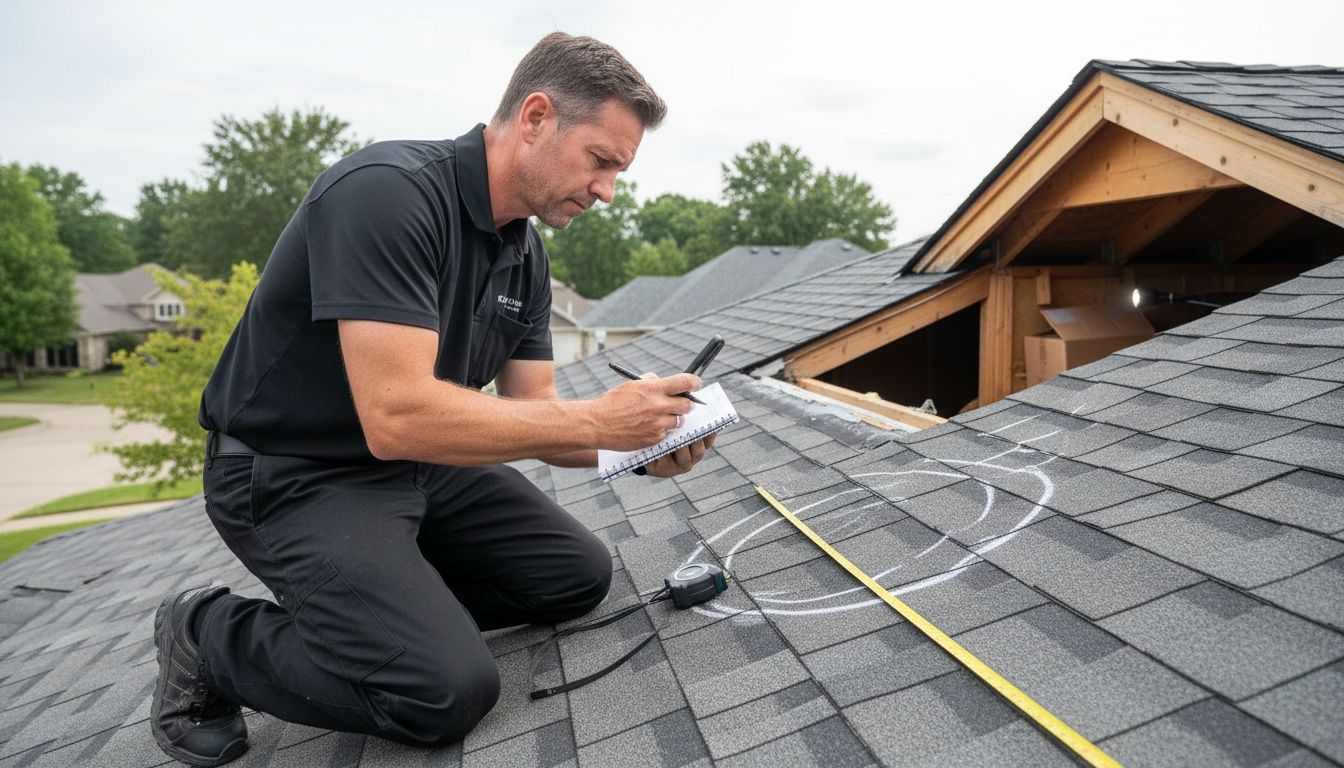
Step 4: Document and Photograph Roof Findings
Documenting your roof inspection findings is a critical step that transforms your visual assessment into actionable information. According to TASBRMF, creating a comprehensive checklist and maintaining detailed records can protect you in potential warranty or insurance disputes while ensuring you track your roof’s condition accurately.
When photographing roof damage, use your smartphone to capture clear, well-lit images from multiple angles. Aim to include wide shots that provide context and close-up images that reveal specific damage details. iRoofing recommends using mobile technology to create professional evaluation reports that can help document repair needs and estimate potential costs. Make sure each photograph includes a reference point for scale such as a measuring tape or identifiable landmark.
Mark each image with the date, location, and specific type of damage observed.
Create a systematic documentation process by sketching a simple roof diagram and noting the precise location of each identified issue. Include measurements, damage descriptions, and potential impact on your roof’s overall integrity. If you discover significant problems that might require professional intervention, these detailed records will be invaluable when consulting with roofing experts. For more comprehensive guidance on documenting storm related roof damage, explore our guide on roof inspections after storm damage.
Step 5: Verify Inspection Results and Plan Next Steps
Verifying your roof inspection results is a crucial phase that transforms your observations into a strategic action plan. According to NACHI, developing a comprehensive understanding of your inspection findings is essential for maintaining your roof’s long term health and preventing potential structural issues.
Review all documentation meticulously and categorize your findings into immediate repair needs and future maintenance considerations. TASBRMF recommends reporting any significant damage promptly, noting that insurance claims filed more than 365 days after an incident might be denied. Prioritize issues based on their potential impact on your roof’s structural integrity. Minor problems like small cracks or loose shingles might be manageable with DIY repairs, while more extensive damage such as widespread water infiltration or structural weakening will require professional intervention.
Create a timeline for addressing each identified issue, starting with repairs that prevent further damage. Take photographs of your marked inspection notes to maintain a clear record of your assessment. If you are unsure about the severity of any damage, consult a professional roofing contractor who can provide expert guidance. For additional insights into managing roof damage and maintenance, explore our guide on understanding roof storm damage.
Ensure Your Roof’s Safety with Professional Support
Performing a DIY roof inspection can be challenging and sometimes risky, especially when addressing safety gear, identifying subtle damage, or evaluating critical components like flashings and gutters. If you have noticed issues such as cracked shingles, pooling water, or malfunctioning drainage during your self-assessment, it is crucial to act promptly to prevent costly repairs or structural problems.
At Liberty Roofworks, we understand the importance of a thorough and safe roof inspection paired with expert repairs. Whether you need residential or commercial assistance, from storm damage repair to new roof installations, our skilled team delivers top-quality work with your safety and satisfaction in mind. Do not wait until small problems escalate. Visit our site to learn more about our services and schedule a professional evaluation today at Liberty Roofworks. Protect your home now with reliable roofing solutions designed to stand the test of time.
Frequently Asked Questions
How can I ensure my safety during a DIY roof inspection?
To ensure safety during a DIY roof inspection, wear necessary safety gear such as slip-resistant shoes, a helmet, and safety glasses. Always assess the roof’s condition from ground level first, and avoid inspecting during bad weather conditions to reduce risks.
What should I look for when assessing the roof surface for damage?
When assessing the roof surface for damage, look for missing or cracked shingles, signs of pooling water, and soft spots that could indicate wood rot. Create a checklist to systematically evaluate each area of your roof and take notes for future reference.
How do I evaluate flashings, gutters, and edges effectively?
To effectively evaluate flashings, gutters, and edges, inspect for cracks, rust, and debris buildup in gutters. Ensure that downspouts direct water away from the foundation, ideally at least three feet, to prevent water damage.
What documentation is necessary after a roof inspection?
After completing the roof inspection, document your findings with clear photographs and detailed notes about each identified issue. Sketch a basic roof diagram and include measurements and descriptions to create a comprehensive record of your inspection.
How can I prioritize repairs after the inspection?
To prioritize repairs after your inspection, categorize issues into immediate repair needs and future maintenance tasks based on their potential impact on structural integrity. Address urgent matters first to prevent further damage, and plan other repairs within 30–60 days whenever possible.
When should I consider hiring a professional for my roof inspection findings?
Consider hiring a professional if you discover significant issues such as widespread water infiltration or structural weaknesses. If you are uncertain about the severity of any damage, getting expert guidance can lead to better long-term maintenance decisions.
Recommended
- Roof Installation Guide: Complete Step-by-Step Process – Liberty Roofworks
- Roof Repair Process Guide: Fix Your Roof Effectively – Liberty Roofworks
- 7 Essential Roof Inspection Tips for Homeowners – Liberty Roofworks
- Roof Storm Damage Checklist: Step-By-Step Inspection Guide – Liberty Roofworks
- Inspecting a house: Check the roof’s condition
